

How to create a DIY craft table with store bought cubby units!
This is such an easy way to build a craft table with lots of storage! You don't need a dedicated craft room for this do-it-yourself craft desk.
There are no tools or major DIY knowledge needed for this tutorial. This craft station could also double as a kitchen island or desk.

I built mine at counter height, but if you change up the cubby size, you could create a shorter version that uses regular dining chairs.
I built this craft table years ago when we started finishing our basement. I later moved this table up to our loft when we turned that into more of a craft and office space.
During our basement finishing, I purged and reorganized what I keep down there, as far as decorative items and crafts.
I want them all out of sight when things were said and done. This project was a big step in that direction. :)
It was perfect!
I wanted to try to do something similar but not have to actually build it. Well, not build it with major power tools anyway. Just minor power tools. ;)
At first I was going to use bookcases to make the table, but I ended up with these cube shelves I see everywhere:

I got the nine cubby organizer unit and I've seen them all over the place for under $50. Here's another option in the same size.
You could also make this an IKEA hack by using their Kallax shelf units that I used for my closet transformation!
I knew exactly what I was going to use for the tabletop – I kept our old laminate island countertop after I replaced it with the butcher block.
I dragged the incredibly insanely unbelievably heavy counter downstairs to put it on top of the cubes:

Oh em gee, that sucker was crazy heavy! And I’m crazy for shuffling it down the stairs by myself, but that is how I roll.
I screwed long screws through the top of the cube shelves and into the bottom of the counterweight a drill to make sure it wasn’t going anywhere. (I used six screws on each side.)
The cubes were just a skosh wider than the island top, but I was fine with that:

I found the little canvas storage cubes for $4 each:

I didn’t get enough for every shelf, just because it was going to get a tad expensive for both sides, and because I thought it would be nice to display some of the decor items I use most often.
I actually have empty shelves on the other side of the desk, so there’s a ton of storage space still left. Ya. hoo.
This spot in the basement will (hopefully) be a small kitchenette some day, so this craft desk will work as a table as well:

(I still need to paint the back of those beadboard panels.)
Originally I was going to put my old craft table in another room down here, but that’s changed for a few reasons.
This way I can be out where I canwatch TV be with the family while I craft:

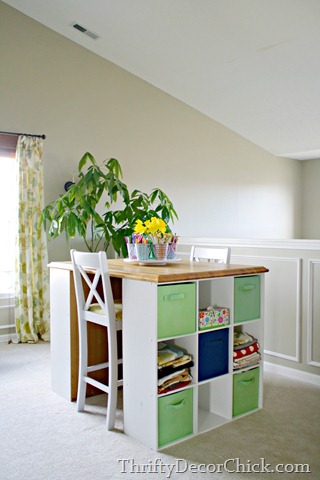
The chairs are actually from our kitchen island, I just brought them down here to see how the size and height works. When it’s in the budget, I plan to get a couple more for this spot.
I love that the table is SO large and we can use it for anything – eating, crafting, puzzles, games, whatever!
I may look into stools instead of chairs, so we can potentially fit a couple more people at the table as well:

My hope is that when we start the electrical in the basement, we can rough in a spot for a pretty little chandelier that will hang over the table. FUN!
The total cost was $100 to build the whole thing – the two cube shelves were $80 and the beadboard backing was $20. (And I have a bunch leftover!)
It only took a few hours total – to put the shelves together, nail the beadboard to the back and secure the island counter to the top:

And we’ve got a custom craft table with TONS of storage:

Ohhhh, I love storage. It makes me SO HAPPY.
I want them all out of sight when things were said and done. This project was a big step in that direction. :)

I wanted to try to do something similar but not have to actually build it. Well, not build it with major power tools anyway. Just minor power tools. ;)
At first I was going to use bookcases to make the table, but I ended up with these cube shelves I see everywhere:

This post may contain affiliate links for your convenience.
See my policies and disclosure page for more information.
I got the nine cubby organizer unit and I've seen them all over the place for under $50. Here's another option in the same size.
I purchased two of the units to act as the "legs" of my table. These are easy to put together and don't take any major tools.
I feel like these units are more sturdy and will hold more weight than similar bookshelves.
You could also make this an IKEA hack by using their Kallax shelf units that I used for my closet transformation!
Because the backing that came with them didn’t cover the entire back, and because I can’t help but pretty things up a bit, I had a beadboard panel cut down:

And then I nailed them into the backs of the cube units.

And then I nailed them into the backs of the cube units.
I knew exactly what I was going to use for the tabletop – I kept our old laminate island countertop after I replaced it with the butcher block.
It’s been sitting in the garage forever and I have always felt like I’d be able to use it for something, and this was it! I LOVE using what I have!
I dragged the incredibly insanely unbelievably heavy counter downstairs to put it on top of the cubes:

Oh em gee, that sucker was crazy heavy! And I’m crazy for shuffling it down the stairs by myself, but that is how I roll.
I screwed long screws through the top of the cube shelves and into the bottom of the counterweight a drill to make sure it wasn’t going anywhere. (I used six screws on each side.)
The cubes were just a skosh wider than the island top, but I was fine with that:

I found the little canvas storage cubes for $4 each:

I didn’t get enough for every shelf, just because it was going to get a tad expensive for both sides, and because I thought it would be nice to display some of the decor items I use most often.
You could use decorative baskets for the cubbies as well!
Pretty much every bit that used to sit on these shelves:

Is now in these bins:

PLUS some! And I am giddy about it!!

Is now in these bins:

PLUS some! And I am giddy about it!!
I was able to store all of my sewing items, paint, glitter, glue...all of it in one spot!
I actually have empty shelves on the other side of the desk, so there’s a ton of storage space still left. Ya. hoo.
This easy DIY project has also worked well for when I use my sewing machine -- it is the perfect cutting table.
This spot in the basement will (hopefully) be a small kitchenette some day, so this craft desk will work as a table as well:

(I still need to paint the back of those beadboard panels.)
Originally I was going to put my old craft table in another room down here, but that’s changed for a few reasons.
One of the biggest is that when I really thought about it, I didn’t want to be in a teeny room away from everybody when working on crafty projects.
This way I can be out where I can

The chairs are actually from our kitchen island, I just brought them down here to see how the size and height works. When it’s in the budget, I plan to get a couple more for this spot.
I love that the table is SO large and we can use it for anything – eating, crafting, puzzles, games, whatever!
The old craft table was great, but it was HUGE. This still has plenty of surface area, and adding so much storage is the cherry on top!
I may look into stools instead of chairs, so we can potentially fit a couple more people at the table as well:

My hope is that when we start the electrical in the basement, we can rough in a spot for a pretty little chandelier that will hang over the table. FUN!
The total cost was $100 to build the whole thing – the two cube shelves were $80 and the beadboard backing was $20. (And I have a bunch leftover!)
If you don’t have an island counter top laying around (but really, who doesn’t??), you could have a piece of wood cut to size and then round off the corners and paint it.
Or maybe some butcher block from IKEA?
It only took a few hours total – to put the shelves together, nail the beadboard to the back and secure the island counter to the top:

And we’ve got a custom craft table with TONS of storage:

Ohhhh, I love storage. It makes me SO HAPPY.
We later moved this up to the loft when we started transforming it from a play room to more of a craft space and office:
 |
| See how I made that cute DIY craft caddy here! |
Never miss a post by signing up to get posts via email.


0 Yorumlar